Sunday, 12 August 2012

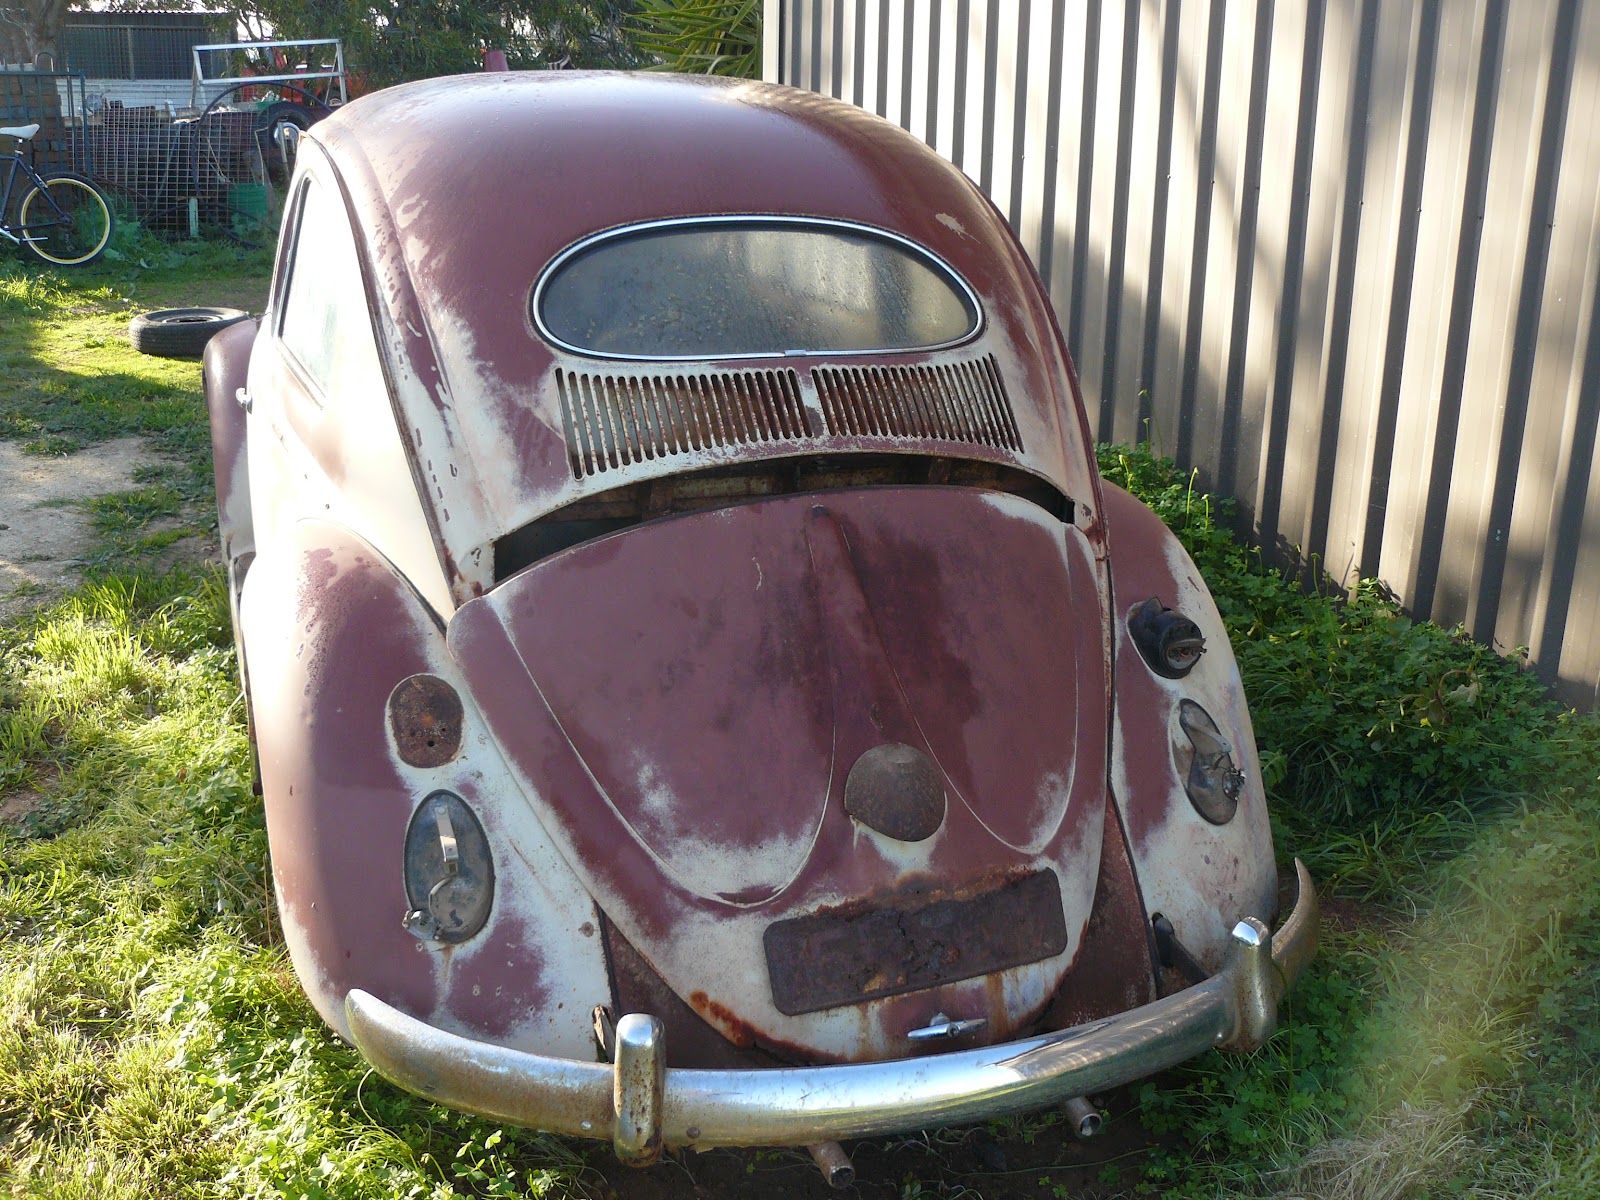
1 owner 1956 Oval

As some of you may know (now you do), I have a 1958 LHD gloss black beetle stashed away (well, it's a body and floor pan only) and it needs every single bolt on part you can imagine.

It is believed that the car came to Australia during the early 1960's with the original owner and ended up owned by a very well known VW man during the 1970's, Mr Ken Virgin. I would love to see some images of the car from that time period and wonder what engine was in it back then.

Anyway, after a while the car was bought another very well known VW man during the 1980's, Mr Roy Williams. It was when Roy owned it (I believe) that I saw the car at a VW show in 1984 or 1985. It was fitted with a 40hp Judson engine from memory and that was it's last public outing. Both Ken and Roy have now passed away so getting photo's of the car from back then is a bit of a task but I will continue that search some time in the future.
 
So, skip forward about 25 years and 5 or so owners and I bought the car. Almost every single item that is needed has been sold or taken off the car and I am in effect owning a body and floor pan- still almost no rust or damage but yes, missing a lot of parts. So when I got a phone call a couple of weeks ago from a VW shop telling me about a complete 1956 oval window for sale, I thought wow, this is my opportunity to get the LHD sort of complete again. Excellent.


I called the owner and drove out to look at the car that night (in the dark and yes it was raining - not ideal!). After a couple of minutes looking at the car, it dawned on me that although the oval needed both heater channels, both lower 'A' pillars and various other sections of steel including some of the deck lid and front hood, it was in remarkable original and complete condition.


It has not been hit anywhere majorly either. The girl selling the car then told me it was her uncles car and he stopped driving it about 20 years ago when something went south with the engine. Hmmm. And he bought it brand new and was still alive. Hmmm. This car should probably be kept together and not dismantled was the impression I was now getting. We did the deal and I then went back last Sunday to collect the car.


As soon as I got the car home, I removed the engine, the wheels, the interior, the windows and most of the small items like speedo, coat hooks etc.


I am pricing up the repair sections at the moment and also working to dismantle the engine down to the crank case (it's a very sad looking engine with mud, dirt, rust etc all over it).

Sunday, 22 July 2012

On the road again

After a smll delay, I got my USB to serial cable this week so I can use the lap top with the EMS ECU in the black car. Cool. The hand held controller was just not doing it for me any more.


I also installed my wide band o2 sensor into the exhaust to get a better idea of what was going on. It's running quite rich at the moment!


No major programming changes were done today, I just went through the motions to ensure it's all going to work and I hope to have it altered within the next month or so.


I re-torqued the wheel bolts, tightened up various bits on the car and installed the rear axle split pins, so with that, the black car is basically ready for action.


Hard to believe this car has not been washed for over 7 years huh?


Friday, 13 July 2012

Friday the 13th

Been a long time since the last post...

The 2028 cc is now running and looking like this:


I retained all of the stainless steel tin ware that was hand made for the 2276 cc but have altered it to fit (a lot of grinding!). Having the Porsche length rods on the 78.8 mm Scat crank tends to make for a narrower engine than the 2276 cc that was in there.

A huge thanks to Andrew for altering the CB performance 48 mm throttle bodies - he cut them in half (height) then milled them to make them flat again and then welded them back together to drop them down about 20 mm. The result is a pair of 48 mm IDF pattern throttle bodies like no other and it all fits perfectly under the lid. Excellent job and I wonder when someone will make them commercially available.

As can also be seen, I have removed the generator and installed a new Smallternator. I had it fitted up within about 10 minutes and with only some minor wiring changes to bypass the regulator it works perfectly. I thoroughly recommend it and a benefit that I didn't consider initially is the reduced weight of the engine. The only pain in the arse was the MSD distributor cap interfering with the alternator. I spent a bit of time with the power file on the steel housing that unbolts from the back of the alternator so I can now remove the MSD cap without too much bother. I doubt if many people are using an MSD or Pertronix on a Type 3 anyway so if you were to run an 010 or 009 etc I doubt this would be a problem.

And just because I could, I have replaced almost every coloured item on the engine with either black or grey items like hose ends and plug leads. Thank you to Rhys for the proper MSD crimper to make up the leads!

The engine runs quite well (considering it's using mostly the 2276 cc ECU mapping (sort of)) and as soon as I get my new cable to connect the serial port of the ECU to the USB of the lap top I will alter the programming to reflect the new engine. Should be relatively simple (!).

Thursday, 20 October 2011

Engine updates - 2276 cc & 2028 cc


The 2276 cc is looking better now. Merged exhaust (1 - 7/8) got here from Vee Dub Parts Unlimited last week and fit perfectly.

Good silver ceramic coating job too.

Thanks Ralph!


As you can see, I also got the Gene Berg pulley bolt & washers so the JayCee pulley is now fixed to the end of the crank good and proper.
 

This is a nice little piece I bought out of the UK from Neil

(http://www.thesamba.com/vw/classifieds/detail.php?id=968666)

Perfect bit of machine work.

Nicely anodised grey too!

Sorry about the shadow in the photo...

I don't think an oil cooler is going to be much of a concern on this engine.


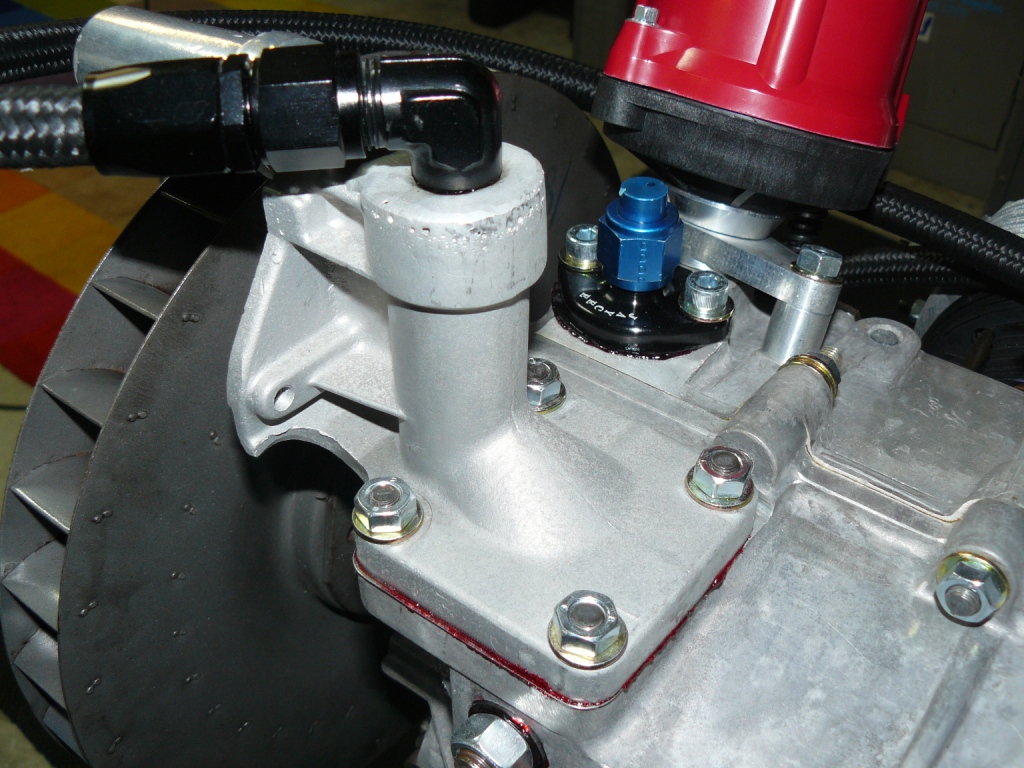
Last job on the engine will be to fabricate the oil and fuel lines because I don't know where we are going to mount the oil filter until we get the engine into the car. I also didn't disturb the brass fitting in the case from when it was in the black VW.

Looks a little out of place but it isn't leaking so why mess with it?


A good view of the oil cooler block off.


The 2028 cc is also coming together quite well.

The short IDF manifolds are temporarily bolted on (still to be match ported) and I have borrowed a pair of IDF throttle bodies while I arrange for another set to be sent over from CB Performance.


I will get a set with the injector bosses drilled however and then get them cut down about 1 inch once they are here as there isn't a great deal of room under the Type 3 engine lid.


Similar to the oil cooler block off on the 2276 cc, I had this oil cooler block off made by Vintage Vee Dub Supplies about 10 years ago.

It routes the galleries out to the Earls oil cooler which is mounted near the gearbox and also cooled with a big thermo fan.

Works perfectly and keeps the engine looking good with minimal crap on top of the engine.

Time and time again I see that Type 3 engines when altered generally look like arse unless you do a bit of thinking.


I also route a small line to the mechanical Auto Meter oil pressure gauge as you can see.


Yes an MSD distributor will fit under the lid of a Type 3 but you will have to run 90' ends and alter the engine lid ribbing.

I also ceramic coated my engine lid to dispense with the factory insulation while I was at it.


The stock breather also looked out of place on this engine so I had the top of the original breather tower welded up and then I tapped it 3/8 NPT to enable a hose to be connected off to a breather mounted elsewhere.

Looks excellent when it's all connected and in the car.

If you use the MSD as the maximum height, you can see why I will be cutting down the throttle bodies - not much room to play with.


More photo's soon. Hope you like them thus far. 

Monday, 3 October 2011

October - Better late than never

So sorry for lack of updates - have been busy with house renovations - relocating water, gas & electrical as well as a lot of digging, drilling and general stuff. Not what I want to do however it has to be done.

What of the VW projects?
  • The 2276 cc from the black VW is now sitting on the bench ready to fire up with new 48 IDA's and with some luck, the new exhaust from California will be here in the next couple of weeks. I removed the engine from the car a month or so ago, dismantled the top end to see how it was looking, soda blasted the combustion chambers, raised the CR to just shy of 10:1 and re-assembled with a host of JayCee odds and sods.


  • The 2028 cc has now been assembled out to the heads. I got my dad to assemble the bottom end of the engine just so he can say he built it. Cool. Engine contains Scat 78.8 mm crank, Scat 4340 lightened flywheel, Berg 90.5 mm pistons and cylinders (dyke's top, total seal 2nd), Eagle 136 mm rods, Engle K8 cam & lifters, Magnum straight cut gears, new AS 41 magnesium case, Berg sump, Berg pump, o'Berg filter, Jaycee push rods & tubes, Scat 1.4:1 rockers, CB wedge port heads, CSP rocker covers, MSD distributor. CR is about 8.6:1 from memory. The engine is awaiting the short IDF manifolds from California (same box as the exhaust for the 2276 cc mentioned above) and then once I have mocked up the throttle bodies (2 x dual throat IDF) that I have grabbed from Greg, the tin ware will be altered to suit the engine and then sent off for paint etc. This new 2028 cc engine should prove to be a reasonable daily driver type deal, especially with heads that contain some decent cooling fins, plus the cam is somewhat mild (boring?). Exhaust is the 1 7/8 unit that was on the 2276 cc previously.


  • Greg's drag car - I have purposely not mentioned this project yet and certainly not shown photo's as it isn't my car however the photo's aren't far off from being shown. Engine: 88 x 94 mm; front narrowed 4 inches; frame head laid back 10'; rear end narrowed 4-6 inches (I forget how much I cut out of it!) and raised 4 inches; rear fenders raised about 5 inches; fuel cell up front; 1 piece fibreglass front; billet pedal assembly; Kirkey racing seat; raised transaxle & engine (2-3 inches adjustable); Ron Lummus wheelie bars; Ron Lummus roll cage (with extra supports everywhere); Ron Lummus flush mount windows. From what I can gather, this might be a rapid car once it's all together. Funny because it hasn't been much of an effort, what with Greg paying the bills and me cutting, welding & assembling the car. Nice not to have to pay for a project for a change.

  • The MK twice GTI is all happy and repaired after the idiot smashed the front. The engine might have been replaced while it was being repaired... Also must thank Rhys for the front end work- replaced the struts, tie rods, all mounts, ball joints and while we were there threw away the sub standard MK 2 brakes in favour of some MK 3 disks, callipers & hubs. The car stops now like it should which is good as the engine does crank along. Almost forgot - replaced the front tyres with some directional semi slick type tyres to sharpen it up around the corners. Magic daily driver and what is most unusual for a VW - I hardly have to work on it because of a failure. Reliable car considering it's 20 years old.

  • The 1602 cc is still on the back burner until the panel van gets the new 2028 cc engine installed and Greg's transaxle is finished along with getting my 2276 cc running again. I just don't have the room right now (hence the work on the house renovations...).

Saturday, 21 May 2011

Okrasa 1500 'S' ??

With the 40hp Okrasa heads back from having been wet blasted, new guides fitted and the original seats re-cut, plus of course being machined out to suit the 83 / 85.5 mm cylinder OD, I thought why not install them on the 1500 'S' bottom end I am building?


As you can see, the heads are only bolted down for measurement purposes.

The bottom end of the 1500 'S' engine is all together now based around the original panel van crank case (60,000 mile case). About the only thing I did to the case, 20 years ago, was to align bore it 0.50 mm. Otherwise it's unmodified.

The crank is a later model 69 mm unit ('X' drilled) and has been balanced along with the NOS alloy and steel fans, flywheel and clutch. The crank was also ground 0.25 mm by the local crank grinding man that has done all of my cranks for the last 15 + years.

Lets just say the con rods are also updated...

The pistons and cylinders are NOS KS 83 mm domed 1500 'S' units that I bought years ago from New York. The pistons have been balanced of course and the cylinders have been high temp VHT painted black just because I hate the look of rust.


The distributor is an original 1500 'S' ZV/JCU4R3 unit that was restored a couple of years ago using NOS parts.

The oil cooler is a reco unit I found also many years ago and is a small gallery unit, correct for the engine.

The oil pump is an NOS German unit also found about 10 years ago.


Next up with the engine is to get the valves, check the chamber volume's, fabricate some manifolds to suit the stock 32 PDSIT 1500 carbs (currently being rebuilt), and once that is done, remove the heads from this engine as they will be bolted onto the original engine currently residing in my 1964 1500 'S'.

That engine already has a 74 mm SPG roller crank and 83 mm bore so these heads should wake it up a bit.
 
While the original engine is out, the flywheel will also be replaced with an NOS crown alloy one that I have had the ring gear changed out to an NOS 6V unit. Still a lot to do but moving forwards.

I wonder if the NOS Abarth exhaust will be here in time as well, just to finish the engine off?

Monday, 18 April 2011

No H2O, GTI, 1602 cc, 2276 cc, 2028 cc & 36hp turbo...


A busy weekend just gone. Simon from WA managed to get a lift to Adelaide from Melbourne (long story) and lobbed at our place Friday afternoon. Been a few years so it was good catch up and have a chat.

Saturday came and with Sime in the old GTI, we went for a quick trip to the local fastener store to collect some hardware for the NOS Crown flywheel that is about to be installed into the 'S' (onto the SPG crank). With that out of the way, we got home just as another friend- Finn lobbed in his T34. I left the boys to it and while I was painting some NOS 90.5 Berg stroker cylinders (Dyke's 1st, Total Seal 2nd) in VHT paint, the boys struck a deal and the T34 became Simon's. Excellent stuff.

Once Sime dropped Finn home and came back, we got on with the task of sorting through the urgent works bearing in mind Simon was going to be driving to Perth on Monday morning! Lots of electrical works managed to get the headlights almost all working (earthing was crap, bulbs were blown), almost got the indicator's working properly (this is an original 6V car too so had to dig through some spares I had in the garage). We then drove it and found the gears were a bit naff- popping out of 1st and 2nd was difficult to engage. Awesome! So off we went to Bob's workshop in the afternoon and bought some spares for the car- fan belt, throttle cable and a few other odds and sods. While we were there, we put the Crown flywheel back together with new rivets, which was a 3 man job to heat the rivets, hold the oxy and bang the rivets. Bugger of a job, but I now have a flywheel that has almost zero run out and uses std VW 'O' ring. This flywheel has been huge undertaking and is worthy of it's own story.

So off we head back to my place where we replaced the shift coupler on the T34 - the old one fell to pieces which wasn't surprising. That helped the gear selection no end but I noted that all the engine & trans axle mounts were stuffed, so I wasn't expecting a miracle. With that done and a bit more engine tidy up we called it a day and caught up with Greg at the pub for a few drinks and dinner.

Sunday morning and we got energetic, moved the gear shifter (stock) over to the left as much as possible and messed around with the linkage which was binding. Starting to drive okay now. As it was my wedding anniversary, I left Sime with it for the day and he went and did some more work on the car with B4. When we caught up last night, Sime was pretty pleased with himself- the gears were now sort of okay due to some clutch adjustment and a new Black Mamba shifter. Nice shifter and not too badly priced for what it is. Of course the gearbox isn't perfect due to the lack of love this car has had previously but it is good enough to drive to Perth. I believe that Simon is going to put some shorter axles on when he gets home anyway, so I can see the car being semi dismantled soon. A good idea that will enable a few other things to be sorted out like the engine mounts etc- and get rid of the funky old muffler etc.

Simon hit the road this morning as I left for work and it sounds like he made it to Ceduna which is a good effort in a 1964 1500 'S' T34 I think. If it has made it that far, I am sure it will make it all the way to Perth without a drama.
 

So what else has been happening? Loads to be honest but not too many photo's have been taken.

First of all the MK 2 GTI has a new engine now- a MK 3 2.0 is now running perfectly and providing me with daily transport. I can't believe what a great engine upgrade this has been and apart from the nightmare of the wiring to integrate it into the MK 2 fuse box, it went very smoothly with no drama's and started up first go. An excellent conversion. But as the car is completely reliable, I am starting to get bored with it already. Perhaps it is time to look for another car...

The Okrasa 40hp heads are now ready to be installed onto the 1602 cc engine which is in the velvet green notchback. I bought the heads late last year out of California and in that time have had them sand blasted, then wet blasted, then machined to suit the 83 mm cylinders, had all the guides K-lined and also had the seats cut (originals). The heads look fantastic now and when time permits, will find their way onto the 'S' engine. While I am at it with that engine, I will install the newly refurbished Crown flywheel. I bought this flywheel last years as well (NOS) and was advised to check the run out at the clutch face as they were known to be a bit ordinary (sometimes) back in the day. So I checked it and of course it was completely out of whack. Why oh why did the Crown people rivet the hub to the clutch area on the piss and then tack weld it together? The hub (heat treated) was cracked due to the welding so I had to have a new hub fabricated. I cut the center out of an old (but perfect) flywheel and handed it to Bob to finish the machine work off- drilling for 10 x rivets, drilling for SPG pattern and generally altering it to reflect the original Crown one (which is now just a paper weight...). Anyway, the flywheel is perfect now so justified the work required to correct it. I sent the flywheel off with a clutch for balancing today and expect it back this week. I also sent off some other engine parts for balancing such as a 69 mm crank that I had ground to 69.10 mm as well as a pair of NOS Type 3 fans (steel and alloy). The crank and fan assemblies will end up in an NOS 1500 'S' engine I have been gathering parts for over the last 20 years. Apart from NOS single port heads, I am just about ready to assemble this engine now. Some of the goodies put away for this engine are quite hard to find now including NOS 83.50 domed 'S' pistons and cylinders machined to suit, a choice of either a ZV JCU 4R3 distributor or a 311 905 205 D distributor (early or late 1500 'S' only) (both restored to perfect condition), a pair of very first production run 1500 'S' carburettor's with the small venturi's etc (restored to perfection of course). I have avoided using the original crank and rods however, and gone with a later crank and brand new rods in an effort to maintain some long term life and reliability. Once I have all the parts in one place, I intend on taking some photo's of it spread out.

And the panel van engine... I have been thinking about the engine in the panel van for a long time now because it concerns me that the cylinder heads have minimal cooling (competition eliminators). I have decided to remove the 2276 cc from the car this year and install a smaller engine with heads that have cooling fins! The engine is currently in the engine stand and is based around a new AS 41 case, a new Scat 78.8 mm crank and new Berg stroker 90.5 mm pistons & cylinders. I still need to get the heads from the USA, along with the cam and lifters, but I am getting closer all the time. The engine will retain the current EMS ECU, tin ware, MSD ignition and exhaust systems. I am contemplating converting the engine over to dual IDF pattern throttle bodies as part of the build. Still not sure about it but it is likely to occur. As for the 2276 cc engine, this will end up in another car, along with the close ratio 4.375 based trans axle but more on that another time.

As for the 36hp turbo motor, I won't post up anything about that until I get a little more progressed because I am at the mercy of the owner of the car that the engine shall reside within. It could prove to be a very interesting build!

Monday, 3 January 2011

MK 2 GTI update


Forgot to mention that the GTI should be back home in another week.
 
As you can see from the image, the GTI copped a bit of damage when some dick reversed into it a while back. I think on reflection it was for the best though as I have replaced the front hood, the GTI grille, headlights, the radiator support panel, all the wheels (Polo 15 inch alloys with low profile Michelin's), and the windscreen seal (there was a small spot of rust under there that required attention). I can't wait to see the car all freshly painted (the front half anyway...).
 
One of the reason's I have been busy of late is the fitting of a low mileage MK 3, 2.0 ABA engine into this car (while it's been getting the panel work completed). The original 1.8 GTI engine had a head gasket failure anyway so it was an easy decision. Not a straight forward conversion by the way!
A big thanks to Rhys for the good work on the engine installation thus far.

2011


Happy new year all.
 
2011 looks to be a busy one for us here.

The bay window van is ready to roll out of our property and onto the next place to have the interior stitched, and the exterior slapped with filler and painted. So long as it stays out of the elements it should stay reasonable for a good amount of time.
That will clear the driveway of other people's cars for a while and will enable me to get back onto my own cars. I was looking at the panel van only this week (while polishing the chrome work) and thinking it needs to be taken out in the fine weather and enjoyed. A bit easier to do that with dead cars out of the way now. Looking forward to starting it up and perhaps giving the EFI a few tweaks as well now that I have another wide band A/F sensor (I always suspected the A/F sensor in the car was a bit off but had no way of proving until recently).
And of course the parts continue to roll in for the 1500 'S' notchback. I am awaiting a delivery of Okrasa 40hp cylinder heads at the moment which, once they arrive, will be machined out to suit the 83 mm cylinders and then installed onto the engine in that car which currently has a 74 mm SPG roller bearing crank, 83 mm P&C's, and various Berg internals. Looking at the engine externally you would have no idea this is inside and that's the way I intend on keeping the engine.
As for the intake system- I am undecided but am leaning towards either some altered stock 32 PDSIT's or some Zenith's on some short manifolds. Either way, the standard air cleaner assembly will be used to keep it looking standard.
I just remembered, I have an NOS crown aluminium flywheel for that engine too which is off at the machine shop right now being balanced so that will complement the SPG roller crank perfectly while I am at it. The flywheel on the engine is currently a 200 mm 'O' ring, 6V ring gear unit drilled to SPG 8 dowel pattern and lightened to 12.5 lbs. This will end up on my 'restored' spare 1500 'S' engine in the engine stand as we speak... but more on that later.
 
All the best for 2011 folks. I promise to do more updating of the blog too!

Sunday, 31 October 2010

Bay Window Resto...


Well, here it is. One of my friends bought this 1971 panel van a couple of years back, perhaps not knowing the extent of the rust lurking but anyway, it is a panel van and there aren't many here to choose from now.

With the body condition in mind, most of the money has gone into the mechanical's on this beast. The front suspension is now adjustable and dropped down, and I have dropped the rear end to match the desired front height. Not as low as some out there for sure but it does look okay and should provide a degree of comfort when belting down the road.


While the front and rear suspension's were being reset, I dropped the trans-axle out for a tidy up and replaced the CV's with new ones, new CV boots of course and ran some new wires down the guts of the chassis to enable the electric fuel pump and tach to operate.
Also just had new battery cables made up today.
The engine mount is off being powder coated at the moment after being altered to clear the merged exhaust. I expect I will see that this week. Then I need to make some mounts to hang the engine and it's all good to go.
Yes that's a solid tail gate from a German fire car or similar we think. Apart from the slight dent on the right side, it's a perfect original lid. Nice score.

 
I built this engine about 5 or so years ago now. 1776 cc, with counter weighted crank, Engle 120 cam, 8.5:1 compression, new dual port heads with larger valves (forget the sizes after all this time), Berg wide deep sump, 26 mm Berg pump, Berg relief valve pump cover, alternator, 36hp dog house shroud, dual 40DCNF's on god knows what manifolds (alloy but can't remember if they were Scat perhaps?), merged exhaust, pertronix pick up, MSD coil, new everything else where it matters.
I have only run the engine for about 5 minutes previously on the floor of my garage to get the timing and carbs running close to correct, so it will be good to see the thing on the road and get it running spot on.
I had a similar engine in my own 1977 Bay Window panel van about 15 years ago and it was no problem getting the van side ways. Surprising how easily these old van's can be made to do burn out's!
With a load of filler and some primer, plus the BRM wheels installed, this old van will live to see another day.

Isotropic rem polishing