Friday, 22 November 2013

There is nothing stopping me now


I have been working on these original Maico disk brakes for a few years now and it's great I am now at the point where I am happy to be able to use them.
 
First up, I sent the rotor housings off for wet blasting. They came back looking beautiful. You could tell the alloy used back then was of an excellent quality. Next I took the calipers with me to Sydney where Boris (http://www.vintageveedub.com.au/) and I dismantled them with the help of a big press (they were seized from having sat for 30 years). I left the calipers with Boris and he arranged to have them honed after having been blasted.
 
The brake pads were also sent off to be re-lined (being unique to he Maico they had to be re-lined). They came back perfect as expected.
 
We ended up throwing the original Maico pistons away and using some pieces from a Ford F100 (from memory) and standard off the shelf brake seals etc. I know we made it an easy thing for future replacements of items if required.
 
I had the steel disks sent off for cadmium plating to keep them from rusting and although they look a bit naff right now, once the brakes are applied the first couple of times, the gold on the disk will burn off and it will look fine.
 
Rounding out the works, I have only just now got the aluminium rotor housings back from chromatic chemical coating (http://keyman.com.au/) and I think they look brilliant. Although the coating isn't a super long term coating, it is better than bare alloy (and it's not as though the car is going to spend even 1 x second in the weather). The fasteners were replaced with new zinc plated high tensile and original bearings replaced with new Japanese made items as well as seals.
 
Nice looking set up huh? And period correct for the notchback. I am lead to believe this set are basically the only ones on the planet now so it's nice to see them in this restored condition and able to be utilised.


Monday, 18 November 2013

North Hollywood delivers


Nice work there North Hollywood Speedo. I hope they make it to me safe and sound. A nice Christmas present for me (or the car?).
 
I don't think they have looked this good since 1964. Thank you to Gizmo Bob for delivering them to NHS as well. Appreciate the effort Bob.

Tuesday, 5 November 2013

The cheap BRM's are bare and raw


I sent my spare set of BRM's off for a chemical dip last week and got them back this afternoon.
 
Very pleased with the result and I expect that over time the alloy will darken which is the desired outcome (the oval window bug which they will be attached to is in a similar condition so they looked out of character in shiny black).


And just because I can, I have cleaned the original 'S' badge up and stuck it in one of the book cases.
 
I will replace it with 100% NOS parts and keep the original on display as a reminder of how much it was looked after, polished to primer and well, just plain enjoyed.
 
True patina.

Friday, 1 November 2013

October and November antics

What a busy couple of months since the last post.

The transaxle is now completely dismantled down to the gears and synchro's etc. Measuring everything up, 1 x shim is a little bit worn, 1 x synchro is almost at it's wear limit and that is about it. I will measure up all my spare shift forks, shift rods and synchro's while the transaxle is in pieces and if I can find better ones (I suspect the originals from the panel van transaxle are slightly better due to only 60k miles on them), I will mix and match until I have the best parts in this transaxle. It will be good to get it back together and up to specs as it is the original transaxle for the car.

The magnesium housings have all been sand blasted, wet blasted, degreased and cleaned 2 or 3 times and the next step for them is to go and get treated at an electroplater with what ever treatment they dictate which leaves the magnesium a gold coloured finish. This will then provide the 'etch' or surface to enable the 2k primer and black paint to be applied. This will happen during November with a bit of luck.

I have also finally measured up the front suspension beam on a granite surface. And yes, as suspected, it has turned out to be slightly twisted. Oddly enough this appears to be from the manufacturing process as there is no obvious damage to the beam. So with that, I have been making up some fixtures to hold the beam in a 100 tonne press and I will apply some pressure to take the twist out of it. It's currently 10mm out of whack (measured from it's extremities), so if I can reduce this to something less than that, it will be a good thing. The car drove perfectly straight and true etc so I can only assume it was like this from the factory. It will be worth the effort to straighten the beam as it is the original for the car.

I am also lead to believe the gauges for the notchback should be completed within the not too distant future too - these are all off at North Hollywood Speedometer http://www.nhspeedometer.com/ . I am having them wave their wand over all 3 x gauges and bring them back to brand new specs (or better in the case of the clock which will have a modern movement installed). It's nice to retain the original items for the car and bring them back to life with fresh paint, chrome and zinc plating etc. Can't wait to see them.

As far as the oval window bug goes, I have just sent the repro BRM's off for a chemical dip http://www.minuspaint.com.au/ and expect to get them back next week completely bare and with no more of that nasty shiny black paint. They look bloody awful when they are glossy and I think I will leave them bare alloy for that car. Perhaps I will just polish the ribs of them but that will be it. I have no desire at all to detail yet another one of my cars!

Professionally it's been a busy couple of months as I am about to change jobs, hence the lack of VW time of late. With Christmas coming, I expect a few more whole days will be able to be devoted to the notchback with the priority being to getting that mechanically complete as soon as I possibly can. I think the car is on the right track for the time being.

Thursday, 26 September 2013

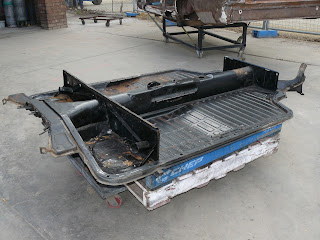
Floor pan, sub frame and front beam ready for action


No battery tray rust, just a few dings to be knocked out.

 
Just dents. No rust.


Not certain but this hole looks original. Anyone know for certain?

 
Seat belt bolt hole to be welded up.

 
Seat belt bolt hole to be welded up.


The all important original chassis number.


Will cut the pan back open here, confirm the welds to the clutch tube are good and have it metal finished back to original shape etc.


Sub frame came up good.
Just a few small dings and scrapes to think about.

 
A big dent in the front beam which needs to be addressed.

 
Original front beam dipped and bare metal while I confirm it's straight and fit for re-use.

 
Original front beam number.


So a bit of work ahead of me now.
 
Lots of small dents in the floor pan to address. A couple of holes from seat belts to disappear.
 
Sub frame needs similar work and a stud welded back into it.
 
The front suspension is the main concern. I suspect it's a bit bent so will confirm that before I invest any time and materials into it.
 
Moving forward at a good pace. The car was complete and driving back in April 2013 so I think I am doing well.

Wednesday, 25 September 2013

Original 1500 'S' trans-axle in the stand ready for dismantling


This is the original trans-axle from the notchback.
 
I have always thought it was just about perfect (smooth as silk), but while the car is being restored, I will dismantle it, replace suspect parts as required and have it re-assembled as per factory.
 
So at this stage I am not expecting anything too bad. All original fasteners etc will be reused 100% and the casings will be painted once again in black as per original.
 
I might install a set of Gene Berg side plate savers just because I can, but that will be about the only deviation from original.

Monday, 9 September 2013

49 years ago today


As you can see, the notchback floor pan, rear sub frame and front suspension is now out of my garage and delivered to Minus Paint. Frank (Minus Paint) will dip all 3 items to remove all the crud and BS from them then de-rust them and finish off with a painting of etch primer.
 
It's quite exciting as the car itself was assembled on this day back in 1964, so 49 years later, the restoration begins. Not sure if it's possible or not, but I will aim to have the car completed by this time in 2014. Even if it's not achieved, it's a good goal to aim for.

Wednesday, 4 September 2013

1500 'S' floor pan 01/09/2013

 
First time this has ever been apart.


Clean and original paint on the hand brake. I will retain this as is.


Original tar stuck to the pan.


You can see where I had to cut the pan to make a repair to the clutch tube a few years ago. This will be re-cut and welded back so it's spot on before paint.


Not a bad floor pan considering it's 49 years old.
 
Surface rust was about what I expected based on the rust discovered below the rear window. Not major but something to deal with.
 
Next step now the pan is stripped down is to get a quote on chemical cleaning and de-rusting then I can attack the dents and dings etc.

Isotropic rem polishing