Tuesday 31 December 2019

2020 Type 3 Vision

Day 1 of 2020 is here and I will continue to attempt to achieve 1 x small job per day on the VW's this year as I have done for the last few years in order to get the cars completed (especially with the T34 heading to South Australia this year).

It really is that simple in building a car- chip away at it slowly and before you know it, you have a cool car. It staggers me the number of people that fail to see this is the easiest way of building a car and they end up selling a half arsed pile of rubbish with parts missing etc. There is no excuse for that.


I recently got some black 3M contact adhesive for attaching the front and rear compartment seals, so I started today on the front compartment as this seal is a genuine VW item (later model VW-1600 that I shortened and glued back together).


Things went perfect and the seal is now stuck down suitably well.
I will let it sit overnight, check it in the morning and if all is well, close the lid to confirm it's all hunky dory.

As for the rear seal...I know that is going to be a pain in the arse. It is not a genuine VW item and while it's close to the correct profile, it isn't spot on. I have started by attaching the top of it to the body only and left it with a bunch of clothes pegs to hold it tight while it sets up. I will continue tomorrow morning with both sides and the clothes pegs idea to hold it all in place. Assuming that all goes well, the bottom of the seal will be attached by mid day (and probably masking taped tight to the body for a bit) and by this time tomorrow night I can then call the rear seal done.

Door seals will be the next items to attach but I better order some more of the black 3M adhesive as I only bought enough for the front and rear. I have plenty to do elsewhere anyway so it's not a problem.


The black VW is looking good. As soon as the hot weather passes, it will go for an outing or two.

Sunday 29 December 2019

Proper Cal-Look height?

Of course there is no answer to the correct height of a Cal-Look VW. That would be just mental to even throw out a number! But for a long time now I have considered that the height of the black VW, especially the rear, was just a bit too low (it used to drag the previous exhaust merged flange every now and then which was sub optimal).
I am also not a fan of having axle's either above or below the differential center line based on the wear this causes to the fulcrum plates and axles etc. The least amount of travel has to be better for wear in my mind.

So the morning after Christmas, I decided it was time to rectify the issue and raise the rear end of the car by 45mm to get the axles near on perfectly at right angles to the differential. It was also a good opportunity to 'fix' a few things that were bugging me too.


Here is the car with straight axles now from the drivers side. I think it has now made the car look more purposeful too.


From the passenger side. Looks exactly how I had planned at the beginning of the day. Yes the sheet on the concrete is to catch a weepy oil filler tube which is another one of those things I will rectify at the next oil change. No biggie.


Here are the 3-piece BRM's and Porsche 356B rear drums outside before they got a cleaning. Not too dirty or anything but I always try to leave things in better condition than when I removed them.


End result from behind the car. Nailed it!

Was a good morning's effort.
Managed to raise the rear end by 45mm, re-lube the torsion bar rubber bushings inside and out ((perfect condition still) genuine NOS VW items as installed 20 years ago), replaced the stainless hardware on the spring plate retainers with original VW hardware; completely cleaned and degreased all components dismantled such as the brakes so they are spot on; replaced the axle nuts with correct CSP 356 Porsche items (wider flange than VW items which I installed unaware back then...), and while I was under there, I replaced an o'Berg bung that had an old temperature sensor in it from the previous ECU that is no longer required just so it looks the goods (no functional change).

Next step on the black VW? Probably a thorough cleaning of the body and chrome to get it shiny again. Mechanically I can't think of anything major to address or alter.
The notchback now needs some more assembly work as far as where my car time needs to go, bearing in mind that with some urgency, my T34 will be heading here in 2020 from Western Australia.

Saturday 14 December 2019

NOS Servicing Paraphernalia

Thank you Terry B for the following NOS paper items which will mostly become display / reference items but could become reproductions for my cars and possibly others.


With the Christmas break upon us, I expect to finish a few things on both the black and green VW's ahead of the T34 making it's way to me in 2020. It could be a very busy year ahead.

Sunday 17 November 2019

NOS lower side trim clips on the 'S'

Was messing with the notchback the other night and saw my NOS lower side trims as well as NOS side trim clips gathering dust in the corner of the assembly room.... so I thought I would install the passenger side one.

NOS 1500 clips of course aren't that hard to find and I had plenty in a VW bag so that was the first task. Jam them in the holes and push them to one side.


The green snot in the photo is cavity wax that has dribbled out. I might clean that up on a hot day in the future. I might not clean it up too. I just don't care.


As you can see, the car is FULL of green cavity wax (Eastwood product) and I also did this years ago to the black VW. As both the green and black VW body's were completely dipped at Minus-Paint, it's a smart move to fill the body shell after the paint work is complete to coat the inside of any cavities. Of course VW from the factory did not do anything and this is why original cars showing zero rust in the heater channels usually are cause for concern- with no paint or protection inside, it's just a matter of time before rust will appear. The smart move is to cut open your heater channels as I did to both of these VW-1500's so you know what is going on in there.

Okrasa Sticker applied after over 30 years storage

Hardly anything amazing here but many years ago while working for Ron Vis at his workshop (I was 13), I was buying a LOT of VW stuff including owners manuals, NOS parts, genuine accessories etc etc. It was super easy to find everything back then and included in one of the owners books he had stashed away from one of his cars was this Oettinger Okrasa sticker.

Of course that was 32 years ago and my memory isn't spot on but I believe this was an original from some time before then, possibly 1970's. I don't know. Certainly it is not a reproduction from now or any time after the late 1980's.


The car is very close now to being finished as can be seen. The carpet is the next big item to complete as well as some engine details. 2020 might see it all come together.


This would be a good candidate for reproduction as an inside mount sticker.


Thanks to Ron Vis for selling me this and to think it only took 30 years for me to find somewhere to stick it!

Saturday 16 November 2019

Oil breather retainer - CSP

I was just about ready to install the original breather to the breather tower about 2 months ago when I thought to myself- 'how absolute shite is the VW retaining nut? and why don't I just install a new CSP one?'

So.... I bought one out of CSP in Germany, waited 2 weeks and was pleased that I had done so. Don't rush into the restoration with garbage parts is the lesson here kids.

As you can see, the CSP retaining 'nut' is a CNC machined item that comes with a special CNC machined tool that fits a 1/2 inch socket wrench for installation.

Yes I have the genuine style socket for the VW style breather 'nut's but... I will never use one of those again in any of my engines.


Here is the tool on the 1/2 drive ready to install into the breather. Yes I have the 'socket' upside down!


Here is the 'nut' installed and very tight (tightening standard VW nut's has always been a challenge if the tool is slightly cocked and this is where the damage starts).


After the nut comes this oil drain cone to direct the oil down. From factory VW installed a washer over the top of this with a slightly smaller hole on some Type 3 engines. I fail to see how restricting that hole is of benefit and have never refitted one on any engines previously so that's how I shall roll with this 1602cc engine too.


And to finish it off, I installed a replacement 'gauze' of plastic supplied by T3HQ Mario in Germany. The NOS cap I have for this engine will be installed at the very last moment because once that is installed, it is impossible to remove without damage to the plastic cap or possibly the breather itself. Best to wait and make sound decisions, not stupid ones if I have to alter anything before the engine is complete.

CSP once again - thanks for this product.

Friday 15 November 2019

CSP Type 3 Linkage upgrade for the 1500 'N' Panel Van

I had been thinking of buying a CSP linkage for quite a while (years) and having spent some time in Germany this year (Bad Camberg and EBI), I made the side trip to Hamburg to see CSP and their fine products, and decided yes, I MUST HAVE THIS.


Installation was simple. Remove some stuff and then install some stuff. Seriously, anyone with some basic tools can do this in about an hour and have it dialed in correctly to suit their engine. The linkage arms come longer than you are likely to require (this is good) so 10 minutes with a saw to 'correct' the threads afterwards is the only thing to be concerned with.


My oil cooler routing block was a pain in the arse as I had to remove it to install the longer bolt. You probably wont have this issue!

This was entirely my fault because I run a remote oil cooler that is thermostatically cooled by a fan controlled by my ECU, not the factory item.


All done, I am super happy with the results.

Smooth as silk and clears everything perfectly.

My previous linkage was a mix of JayCee parts and items I fabricated. It was OK but not as linear as this due to the physical size of the JayCee item I was using (now donated to Simon for his drag bug).

Thanks CSP once again. Keep developing Type 3 parts and I will keep buying them especially with a T34 under construction in 2020 and beyond now.

CSP Python exhaust upgrade to the 1500 'N' Panel Van

This was another of those- 'I must do something about the exhaust system now the engine is smaller' thoughts I have had for a few years now.
I finally pulled the trigger on getting a CSP Python exhaust system as it seems to be the only system that has equal length primaries, offered in different sizing to suit your engine (I went for 42mm), supported by extra mounts (off the bumper brackets) so as not to crack in the longer term, constructed of stainless steel and exits out the correct VW apron location.

I also like that CSP fitted a heat shield that to the top of the muffler to assist in stopping the heat transfer to the rubber fresh air bellows. Depending on your engine width, this could require some 'tweaking' as indeed my car did.

I had to clearance perhaps 5mm to 10mm off the shield on the right hand side which was somewhat expected. If you have a standard width engine, I suspect you will have no clearance issues.


Here it is mounted up and showing clearance to the apron- about 10mm which is adequate.


I think it looks fantastic. Hides a lot of the engine too!


This is the #3 & #4 side as I was installing it. You can see I hadn't quite bolted the heat shield down at this point but it's in place. This is a great idea in order to prolong the life of your rubber air intake bellows.


As you can see on the #1 & #2 side, I had a stainless steel (CSP supplied) oxygen sensor bung welded to the pipe leading into the muffler.

Thanks TW Engineering for welding that on before work one morning!

Thanks CSP for supplying yet another excellent product to me for the 1500 'N' Panel Van!

Thursday 14 November 2019

T34 in the collection


I knew this would happen eventually.

After my recent trip to Germany and seeing the price of decent T34's shooting through the roof, I was on the prowl for a decent T34 project. About 2 months ago while working in Sydney I was inundated with calls about this car that had just been advertised for sale in WA. For the most part I ignored the calls because I was nowhere near home, the car was thousands of km away from me even if I was in Adelaide and it just was not something I wanted to commit to buying without seeing for myself.
Next thing you know, Simon in Fremantle calls me to say he will go look at the car as it's semi-local to him and as Simon has a T34 himself, he knows what he is looking for when it comes to these often rusty and damaged cars. hmmmmmm. OK lets do this. And Simon offered to keep the car at his place until I was ready for it to be sent to me.....
A couple of hours later and the deal was done. I now owned a T34!


As it so happens I had business in Western Australia recently and was able to see the car laid out with all the parts to determine what I had bought. I also had to raise the suspension all round as the car was so low, some retard had dragged the car onto a car trailer and damaged the underside of the floor-pan which had only just been 100% restored with new pan halves, paint etc. That was not something I wanted to see or rectify but alas, not many people seem to give a flying fuck about others property it would seem.


Here it is on Simon's front yard. The car included a spare pair of doors as well as a good amount of brand new seals, window rubbers, window trim, and most of the original parts boxed up. The engine is missing which is not a problem as I have plans for that already. The trans-axle is freshly rebuilt as was the entire floor-pan as stated earlier. Although it looks bad in photo's, the car is super straight and the rust seems to be fairly normal for a T34 which isn't overly concerning. As soon as is viable, the car will come home and the works will commence. I better get the notchback 100% completed now!

Thanks to Simon for doing the deal as well as storing it for a bit! This could be my biggest project yet.

Headlight earthing completed on the 1500 'S'

It's all about the details. I applied my reproduction Super/Premium foil sticker to the car recently as per factory (engine is 8.5:1 compression as per original) so that's another job done. Yes that tire is brand new and that brown stuff is protective wax! I might clean the tire at a later date but for now, not a big deal.


Here is the passenger side earth wire connected in original location with original screw. How nice is that original material stuck on the inside of the trunk? Amazing original car.


And here is the drivers side. Same as the other in every respect and assuming I ever put a battery in the car, it checks out and should all work as original.


Next job for me on the car is probably to fit the pop out windows which is a bit of a daunting task as I have to find the 3 x holes each side under the headlining without damaging anything.

NOS front liner for the 1500 'S'

This is one of those NOS items I just had to have in order to finish the notchback off just right and with much reluctance I paid way too much for this piece of cardboard and had it sent to me from Germany recently.

But...... I am happy to have done so as it looks spot on and will finish the front of the car.


Part number written underneath. I wish someone was reproducing these liners as it seems every early Type 3 has a knackered one by now.


As soon as the fuel tank is connected and the steering somewhat aligned, this gets installed and I will probably never put a single item on top of it!

Thanks Mario at T3HQ Germany for sourcing, boxing and sending this rare item.

Parcel shelf finished for 1500 'S'


Okrasa heads now 35.5mm x 32mm

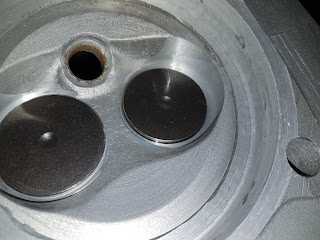
I recently removed the Okrasa heads from the 1602cc engine as I was not happy with the stock valve sizing as installed by Okrasa back in the day. It was 33mm x 32mm. I figured now was the right time to do any modifications (before the engine has run) so I sent them off to TW Engineering where Tony had a looky and determined that a stock 35.5mm intake could be installed onto the current intake seats. FANTASTIC.


While Tony was there messing with this old rubbish he also opened up the chambers around all the valves which is also something I was concerned about. All the intake seats were machined to suit the 35.5mm valves and now I am happy with the way the heads have ended up.


Installing these won't take very much time or effort as nothing fundamentally has changed (slight cc increase).

Thanks again to the boys at TW Engineering for sorting these out.

Isotropic rem polishing